Knowledge Center
LoRa communication (advanced)

Introduction #
In this example we use a:
- Raspberry Pi as reciever
- Raspberry Pi Pico microcontroller as transmitter
But now with proper libraries to configure the LoRa devices
Raspberry Pi as reciever #
Config RPI:
- Enable UART interface with raspi-config and reboot
- Install Python serial with: sudo apt-get install python3-serial
- Create a Virtual Environment: sudo python3 -m venv /venv
- Activate virtual environment: source /venv/bin/activate
- Install libraries: sudo /venv/bin/pip3 install ebyte-lora-e220-rpi RPi.GPIO
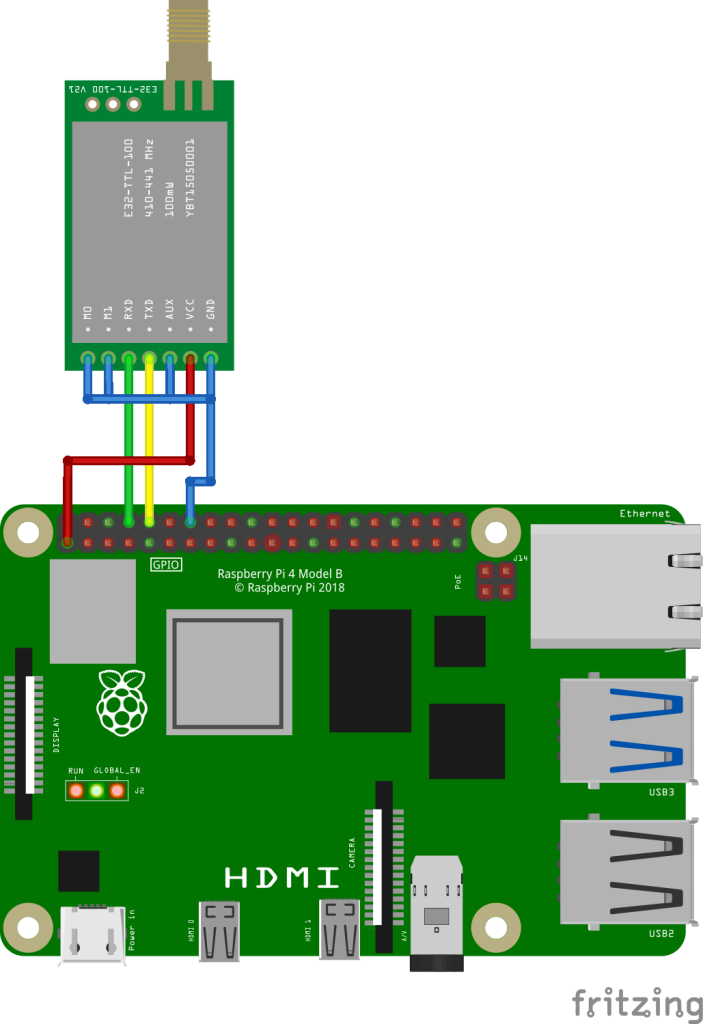
Wire Lora module:
| RPI | LoRa Module |
|---|---|
| GND | GND |
| 3V3 | VCC |
| GND | AUX |
| TXD (GPIO 14 / PIN 8) | RXD |
| RXD (GPIO 15 / PIN 10) | TXD |
| GND | M1 |
| GND | M0 |
Library:
Latest versions:
https://pypi.org/project/ebyte-lora-e220-rpi/#description
https://github.com/xreef/EByte_LoRa_E220_python_raspberrypi_library
Python code:
In this code we added a address and channel for the reciever, also we use FIXED transmission, wich means it is listening for a specific ID and channel.
from lora_e220_operation_constant import ResponseStatusCode
from lora_e220_constants import FixedTransmission, RssiEnableByte
import serial
import time
import RPi.GPIO as GPIO

loraSerial = serial.Serial('/dev/ttyS0', baudrate=9600, parity=serial.PARITY_NONE, stopbits=serial.STOPBITS_ONE, bytesize=serial.EIGHTBITS)
lora = LoRaE220('400T22D', loraSerial, aux_pin=19, m0_pin=27, m1_pin=13)

code = lora.begin()
print("Initialization: {}", ResponseStatusCode.get_description(code))

# Set the configuration to default values and print the updated configuration to the console
# Not needed if already configured
configuration_to_set = Configuration('400T22D')
configuration_to_set.ADDH = 0x00 # Address of this receiver
configuration_to_set.ADDL = 0x03 # Address of this receiver
configuration_to_set.CHAN = 5 # Channel of this receiver
configuration_to_set.TRANSMISSION_MODE.fixedTransmission = FixedTransmission.FIXED_TRANSMISSION
# To enable RSSI, you must also enable RSSI on sender
configuration_to_set.TRANSMISSION_MODE.enableRSSI = RssiEnableByte.RSSI_DISABLED
code, confSetted = lora.set_configuration(configuration_to_set)

code, configuration = lora.get_configuration()
print("Retrieve configuration: {}", ResponseStatusCode.get_description(code))
print_configuration(configuration)

try:
  while True:
    available_data = lora.available()
    if available_data > 0:
      code, value = lora.receive_message()
      if code == ResponseStatusCode.SUCCESS:
        print("Message:", value)
      else:
        print("Error receiving data:", ResponseStatusCode.get_description(code))
except KeyboardInterrupt:
  print("Script aborted! Cleaning GPIO...")
  GPIO.cleanup()
When you run the above code you will see the following in the console:
Initialization: {} Success
Retrieve configuration: {} Success
----------------------------------------
HEAD :  0xc1   0x0   0x8

AddH :  0x0
AddL :  0x3

Chan :  5  ->  415

SpeedParityBit :  0b0  ->  8N1 (Default)
SpeedUARTDatte :  0b11  ->  9600bps (default)
SpeedAirDataRate :  0b10  ->  2.4kbps (default)

OptionSubPacketSett:  0b0  ->  200bytes (default)
OptionTranPower :  0b0  ->  22dBm (Default)
OptionRSSIAmbientNo:  0b0  ->  Disabled (default)

TransModeWORPeriod :  0b11  ->  2000ms (default)
TransModeEnableLBT :  0b0  ->  Disabled (default)
TransModeEnableRSSI:  0b0  ->  Disabled (default)
TransModeFixedTrans:  0b1  ->  Fixed transmission (first three bytes can be used as high/low address and channel)
----------------------------------------
The LoRa module is now listening for incoming messages.
Raspberry Pi PICO as transmitter #
Config RPI PICO:
- Install micropython on the PICO
- Install the lora e220 library for micropython
Latest versions:
https://pypi.org/project/ebyte-lora-e220/#description
https://github.com/xreef/EByte_LoRa_E220_micropython_library
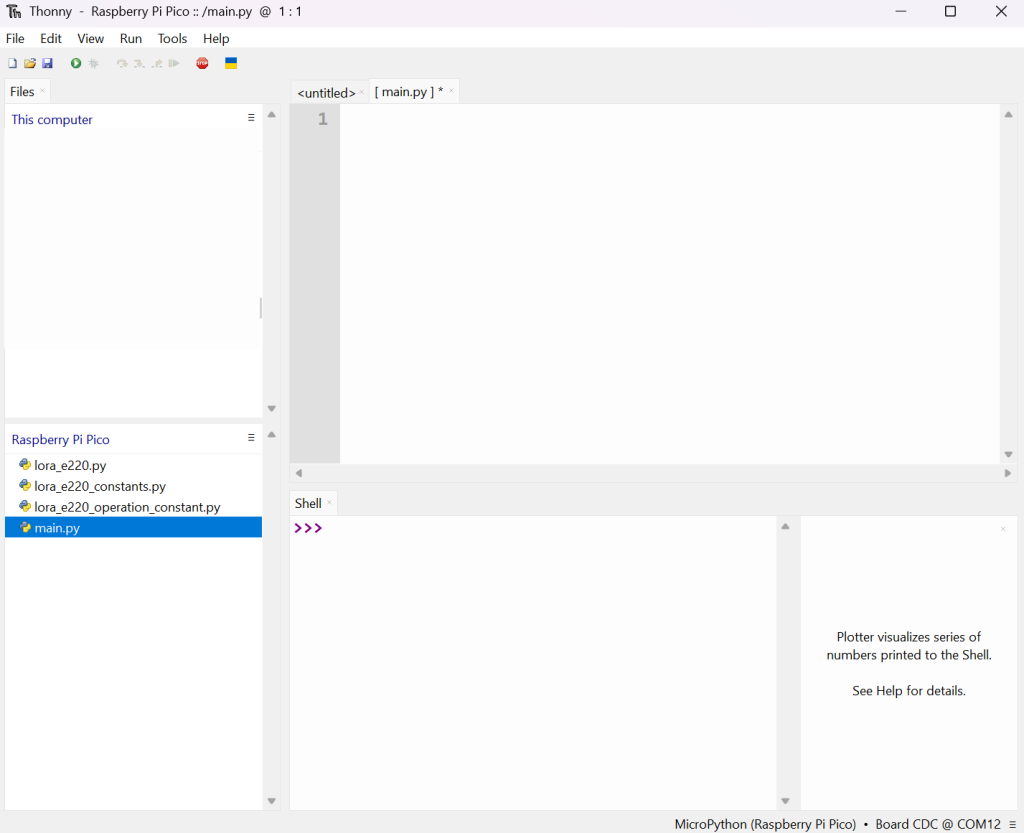
In thonny upload the files in the PICO root like this:
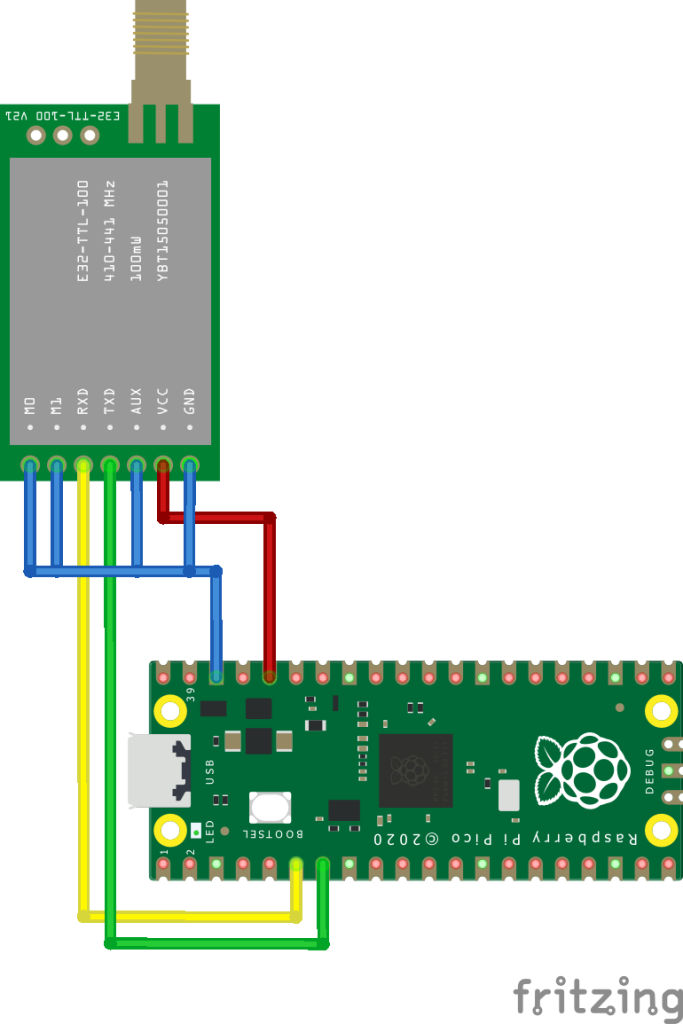
Wire Lora module:
| RPI PICO | LoRa Module |
|---|---|
| GND | GND |
| 3V3 | VCC |
| GND | AUX |
| TXD1 (GPIO 4 / PIN 6) | RXD |
| RXD1 (GPIO 5 / PIN 7) | TXD |
| GND | M1 |
| GND | M0 |
Python code (main.py):
from lora_e220 import LoRaE220, print_configuration, Configuration
from lora_e220_constants import FixedTransmission, RssiEnableByte
from lora_e220_operation_constant import ResponseStatusCode
from lora_e220 import LoRaE220
from machine import Pin
from machine import UART
import time

uart = UART(1, 9600)
lora = LoRaE220('400T22D', uart, aux_pin=15, m0_pin=21, m1_pin=19)

code = lora.begin()
print("Initialization: {}", ResponseStatusCode.get_description(code))

# Set the configuration to default values and print the updated configuration to the console
# Not needed if already configured
configuration_to_set = Configuration('400T22D')
configuration_to_set.ADDH = 0x00 # Address of this sender
configuration_to_set.ADDL = 0x02 # Address of this sender
configuration_to_set.CHAN = 5 # Channel of this sender
configuration_to_set.TRANSMISSION_MODE.fixedTransmission = FixedTransmission.FIXED_TRANSMISSION
# # To enable RSSI, you must also enable RSSI on receiver
configuration_to_set.TRANSMISSION_MODE.enableRSSI = RssiEnableByte.RSSI_DISABLED
code, confSetted = lora.set_configuration(configuration_to_set)
#
code, configuration = lora.get_configuration()
print("Retrieve configuration: {}", ResponseStatusCode.get_description(code))
print_configuration(configuration)

counter = 0

while True:
  counter = counter + 1
  print("send message:", counter)
  #lora.send_transparent_message(str(counter))
  #code = lora.send_fixed_message(0, 3, 23, "Hello LoRa")
  lora.send_fixed_message(0, 3, 5, '0-3-5:' + str(counter))
  #data = {'key1': 'value1', 'key2': 'value2'}
  #code = lora.send_transparent_dict(data)
  print("Send message: {}", ResponseStatusCode.get_description(code))
  #time.sleep(.2)
  #lora.send_fixed_message(0, 3, 23, 'pippo0-3-23' + str(counter))
  #print("Send message: {}", ResponseStatusCode.get_description(code))
  time.sleep(2)
When you run the above script on the PICO you will get the following output to the console:
MPY: soft reboot
Initialization: {} Success
Retrieve configuration: {} Success
----------------------------------------
HEAD :  0xc1   0x0   0x8

AddH :  0x0
AddL :  0x2

Chan :  5  ->  415

SpeedParityBit :  0b0  ->  8N1 (Default)
SpeedUARTDatte :  0b11  ->  9600bps (default)
SpeedAirDataRate :  0b10  ->  2.4kbps (default)

OptionSubPacketSett:  0b0  ->  200bytes (default)
OptionTranPower :  0b0  ->  22dBm (Default)
OptionRSSIAmbientNo:  0b0  ->  Disabled (default)

TransModeWORPeriod :  0b11  ->  2000ms (default)
TransModeEnableLBT :  0b0  ->  Disabled (default)
TransModeEnableRSSI:  0b0  ->  Disabled (default)
TransModeFixedTrans:  0b1  ->  Fixed transmission (first three bytes can be used as high/low address and channel)
----------------------------------------
send message: 1
Send message: {} Success
send message: 2
Send message: {} Success
send message: 3
Send message: {} Success
send message: 4
Send message: {} Success
Recieving data #
When you have the PICO started and the Raspberry is listening with the python script you will see this output on the rapsberry pi:
Retrieve configuration: {} Success
----------------------------------------
HEAD :  0xc1   0x0   0x8

AddH :  0x0
AddL :  0x3

Chan :  5  ->  415

SpeedParityBit :  0b0  ->  8N1 (Default)
SpeedUARTDatte :  0b11  ->  9600bps (default)
SpeedAirDataRate :  0b10  ->  2.4kbps (default)

OptionSubPacketSett:  0b0  ->  200bytes (default)
OptionTranPower :  0b0  ->  22dBm (Default)
OptionRSSIAmbientNo:  0b0  ->  Disabled (default)

TransModeWORPeriod :  0b11  ->  2000ms (default)
TransModeEnableLBT :  0b0  ->  Disabled (default)
TransModeEnableRSSI:  0b0  ->  Disabled (default)
TransModeFixedTrans:  0b1  ->  Fixed transmission (first three bytes can be used as high/low address and channel)
----------------------------------------
Message: 0-3-5:1
Message: 0-3-5:2
Message: 0-3-5:3
Message: 0-3-5:4
With RSSI (Received Signal Strength Indicator) enabled #
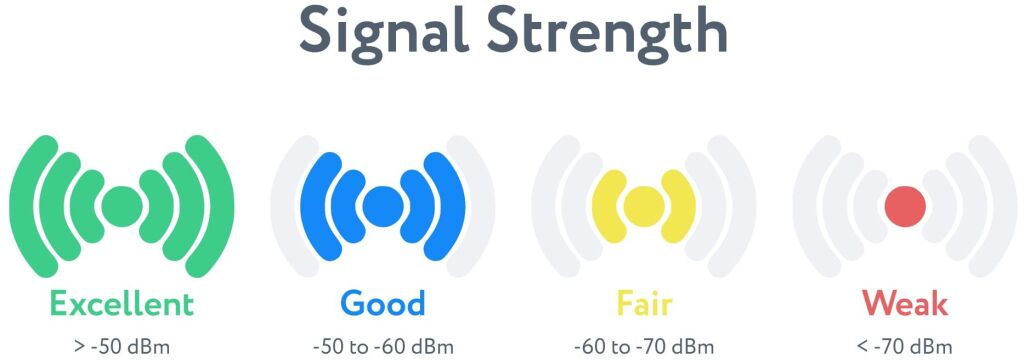
RSSI vs dBm
dBm and RSSI are different units of measurement that both represent the same thing: signal strength. The difference is that RSSI is a relative index, while dBm is an absolute number representing power levels in mW (milliwatts).
RSSI is a term used to measure the relative quality of a received signal to a client device, but has no absolute value. The IEEE 802.11 standard (a big book of documentation for manufacturing Wi-Fi equipment) specifies that RSSI can be on a scale of 0 to up to 255 and that each chipset manufacturer can define their own “RSSI_Max” value. Cisco, for example, uses a 0-100 scale, while Atheros uses 0-60. It’s all up to the manufacturer (which is why RSSI is a relative index), but you can infer that the higher the RSSI value is, the better the signal is.
Since RSSI varies greatly between chipset manufacturers, MetaGeek software uses a more standardized, absolute measure of signal strength: received signal power, which is measured in decibels, or dBm on a logarithmic scale. There’s a lot of math we could get into, but basically, the closer to 0 dBm, the better the signal is.
| Signal Strength | TL;DR | Required for | |
|---|---|---|---|
| -30 dBm | Amazing | Max achievable signal strength. The client can only be a few feet from the AP to achieve this. Not typical or desirable in the real world. | N/A |
| -67 dBm | Very Good | Minimum signal strength for applications that require very reliable, timely delivery of data packets. | VoIP/VoWi-Fi, streaming video |
| -70 dBm | Okay | Minimum signal strength for reliable packet delivery. | Email, web |
| -80 dBm | Not Good | Minimum signal strength for basic connectivity. Packet delivery may be unreliable. | N/A |
| -90 dBm | Unusable | Approaching or drowning in the noise floor. Any functionality is highly unlikely. | N/A |
Change this line on the PICO to ENABLED:
configuration_to_set.TRANSMISSION_MODE.enableRSSI = RssiEnableByte.RSSI_ENABLEDChange these lines on the reciever (RPI):
configuration_to_set.TRANSMISSION_MODE.enableRSSI = RssiEnableByte.RSSI_ENABLED
...
...
    if available_data > 0:
      code, value, rssi = lora.receive_message(rssi=True)
      if code == ResponseStatusCode.SUCCESS:
        print("Message:", value, "/ RSSI:", rssi)
      else:
        print("Error receiving data:", ResponseStatusCode.get_description(code))
Send dictonary (JSON) #
To send a dictonairy JSON type message use:
  data = {'counter': counter, 'id': 'testunit'}
  code = lora.send_fixed_dict(0, 3, 5, data)
Add encyption to your data #
To add encryption, you can add these configuration lines to the config, please make sure both devices (transmitter and reciever) have the same numbers!
configuration_to_set.CRYPT.CRYPT_H = 44
configuration_to_set.CRYPT.CRYPT_L = 123
Enable LBT #
The LBT (Listen Before Talk) function in LoRa data transmission modules is a protocol or technique used for wireless communication, aimed at reducing or avoiding channel collisions and improving communication quality and efficiency. In LBT, devices listen to the channel before transmitting data to ensure channel availability, thereby reducing the likelihood of collisions.
To enable LBT extend the import library and set the LBT to enabled:
from lora_e220_constants import OperatingFrequency, FixedTransmission, TransmissionPower, \
    AirDataRate, UARTParity, UARTBaudRate, RssiAmbientNoiseEnable, SubPacketSetting, WorPeriod, \
    LbtEnableByte, RssiEnableByte, TransmissionPower22
...
configuration_to_set.TRANSMISSION_MODE.enableLBT = LbtEnableByte.LBT_ENABLED
...
Increase air datarate #
The default datarate is 2.4K, to increase it to e.g. 9.6K, add/change this line:
configuration_to_set.SPED.airDataRate = AirDataRate.AIR_DATA_RATE_100_96| 2 | 1 | 0 | Air data rate(bps) | Constant value |
| 0 | 0 | 0 | 0.3k | AIR_DATA_RATE_000_03 |
| 0 | 0 | 1 | 1.2k | AIR_DATA_RATE_001_12 |
| 0 | 1 | 0 | 2.4k (default) | AIR_DATA_RATE_010_24 |
| 0 | 1 | 1 | 4.8k | AIR_DATA_RATE_011_48 |
| 1 | 0 | 0 | 9.6k | AIR_DATA_RATE_100_96 |
| 1 | 0 | 1 | 19.2k | AIR_DATA_RATE_101_192 |
| 1 | 1 | 0 | 38.4k | AIR_DATA_RATE_110_384 |
| 1 | 1 | 1 | 62.5k | AIR_DATA_RATE_111_625 |
Complete code for reciever and transmitter #
Reciever (RPI):
from lora_e220 import LoRaE220, print_configuration, Configuration
from lora_e220_operation_constant import ResponseStatusCode
from lora_e220_constants import OperatingFrequency, FixedTransmission, TransmissionPower, \
    AirDataRate, UARTParity, UARTBaudRate, RssiAmbientNoiseEnable, SubPacketSetting, WorPeriod, \
    LbtEnableByte, RssiEnableByte, TransmissionPower22
import serial
import time
import RPi.GPIO as GPIO

loraSerial = serial.Serial('/dev/ttyS0', baudrate=9600, parity=serial.PARITY_NONE, stopbits=serial.STOPBITS_ONE, bytesize=serial.EIGHTBITS)
lora = LoRaE220('400T22D', loraSerial, aux_pin=19, m0_pin=27, m1_pin=13)

code = lora.begin()
print("Initialization:", ResponseStatusCode.get_description(code))

# Set the configuration to default values and print the updated configuration to the console
configuration_to_set = Configuration('400T22D')
configuration_to_set.ADDH = 0x00 # Address of this receiver
configuration_to_set.ADDL = 0x03 # Address of this receiver
configuration_to_set.CHAN = 5 # Channel of this receiver
configuration_to_set.SPED.airDataRate = AirDataRate.AIR_DATA_RATE_010_24
configuration_to_set.SPED.uartBaudRate = UARTBaudRate.BPS_9600
configuration_to_set.SPED.uartParity = UARTParity.MODE_00_8N1

# TRANSMISSION SETTINGS
configuration_to_set.TRANSMISSION_MODE.fixedTransmission = FixedTransmission.FIXED_TRANSMISSION
configuration_to_set.TRANSMISSION_MODE.enableLBT = LbtEnableByte.LBT_DISABLED
# To enable RSSI, you must also enable RSSI on sender
configuration_to_set.TRANSMISSION_MODE.enableRSSI = RssiEnableByte.RSSI_ENABLED

# ENCRYPTION SETTINGS
configuration_to_set.CRYPT.CRYPT_H = 44
configuration_to_set.CRYPT.CRYPT_L = 123

# SET CONFIGURATION
code, confSetted = lora.set_configuration(configuration_to_set)

# LOAD CONFIGURATION
code, configuration = lora.get_configuration()
print("Retrieve configuration:", ResponseStatusCode.get_description(code))
print_configuration(configuration)

try:
  while True:
    try:
      available_data = lora.available()
      if available_data > 0:
        code, value, rssi = lora.receive_message(rssi=True)
        if code == ResponseStatusCode.SUCCESS:
          print("Recieved message:", value, "/ RSSI dBm:", -(256-rssi))
        else:
          print("Error receiving data:", ResponseStatusCode.get_description(code))
    except:
      print("Error decoding!")

except KeyboardInterrupt:
  print("Script aborted! Cleaning GPIO...")
  GPIO.cleanup()
Transmitter (PICO):
from lora_e220 import LoRaE220, print_configuration, Configuration
from lora_e220_constants import OperatingFrequency, FixedTransmission, TransmissionPower, \
    AirDataRate, UARTParity, UARTBaudRate, RssiAmbientNoiseEnable, SubPacketSetting, WorPeriod, \
    LbtEnableByte, RssiEnableByte, TransmissionPower22
from lora_e220_operation_constant import ResponseStatusCode
from lora_e220 import LoRaE220
from machine import Pin
from machine import UART
import time

uart = UART(1, 9600)
lora = LoRaE220('400T22D', uart, aux_pin=15, m0_pin=21, m1_pin=19)

code = lora.begin()
print("Initialization:", ResponseStatusCode.get_description(code))

# Set the configuration to default values and print the updated configuration to the console
configuration_to_set = Configuration('400T22D')
configuration_to_set.ADDH = 0x00 # Address of this sender
configuration_to_set.ADDL = 0x02 # Address of this sender
configuration_to_set.CHAN = 5 # Channel of this sender
configuration_to_set.SPED.airDataRate = AirDataRate.AIR_DATA_RATE_010_24 #2.4kbps
configuration_to_set.SPED.uartBaudRate = UARTBaudRate.BPS_9600
configuration_to_set.SPED.uartParity = UARTParity.MODE_00_8N1
# Transmission modes
configuration_to_set.TRANSMISSION_MODE.fixedTransmission = FixedTransmission.FIXED_TRANSMISSION
configuration_to_set.TRANSMISSION_MODE.enableLBT = LbtEnableByte.LBT_ENABLED
# To enable RSSI, you must also enable RSSI on receiver
configuration_to_set.TRANSMISSION_MODE.enableRSSI = RssiEnableByte.RSSI_ENABLED

# ENCRYPTION SETTINGS
configuration_to_set.CRYPT.CRYPT_H = 44
configuration_to_set.CRYPT.CRYPT_L = 123

# SET CONFIGURATION
code, confSetted = lora.set_configuration(configuration_to_set)

# LOAD CONFIGURATION
code, configuration = lora.get_configuration()
print("Retrieve configuration:", ResponseStatusCode.get_description(code))
print_configuration(configuration)

counter = 0

while True:
  counter = counter + 1
  print("Counter:", counter)
  data = {'counter': counter, 'id': 'testunit'}
  code = lora.send_fixed_dict(0, 3, 5, data)
  print("Send message:", ResponseStatusCode.get_description(code))
  time.sleep(2)
Reciever console output:
Initialization: Success
Retrieve configuration: Success
----------------------------------------
HEAD :  0xc1   0x0   0x8

AddH :  0x0
AddL :  0x3

Chan :  5  ->  415

SpeedParityBit :  0b0  ->  8N1 (Default)
SpeedUARTDatte :  0b11  ->  9600bps (default)
SpeedAirDataRate :  0b10  ->  2.4kbps (default)

OptionSubPacketSett:  0b0  ->  200bytes (default)
OptionTranPower :  0b0  ->  22dBm (Default)
OptionRSSIAmbientNo:  0b0  ->  Disabled (default)

TransModeWORPeriod :  0b11  ->  2000ms (default)
TransModeEnableLBT :  0b0  ->  Disabled (default)
TransModeEnableRSSI:  0b1  ->  Enabled
TransModeFixedTrans:  0b1  ->  Fixed transmission (first three bytes can be used as high/low address and channel)
----------------------------------------
Recieved message: {"id": "testunit", "counter": 12} / RSSI dBm: -10
Recieved message: {"id": "testunit", "counter": 13} / RSSI dBm: -8
Recieved message: {"id": "testunit", "counter": 14} / RSSI dBm: -8
Recieved message: {"id": "testunit", "counter": 15} / RSSI dBm: -7
Recieved message: {"id": "testunit", "counter": 16} / RSSI dBm: -10
Recieved message: {"id": "testunit", "counter": 17} / RSSI dBm: -7
Recieved message: {"id": "testunit", "counter": 18} / RSSI dBm: -9
Recieved message: {"id": "testunit", "counter": 19} / RSSI dBm: -7
Recieved message: {"id": "testunit", "counter": 20} / RSSI dBm: -10
Recieved message: {"id": "testunit", "counter": 21} / RSSI dBm: -10
Recieved message: {"id": "testunit", "counter": 22} / RSSI dBm: -10
Recieved message: {"id": "testunit", "counter": 23} / RSSI dBm: -10
Recieved message: {"id": "testunit", "counter": 24} / RSSI dBm: -10
Recieved message: {"id": "testunit", "counter": 25} / RSSI dBm: -7
Recieved message: {"id": "testunit", "counter": 26} / RSSI dBm: -10
Recieved message: {"id": "testunit", "counter": 27} / RSSI dBm: -7

