Knowledge Center
Orange Pi Zero 3 – CAN 2.0B Classic
Used image: Orangepizero3_1.0.4_debian_bookworm_server_linux6.1.31
Software needed:
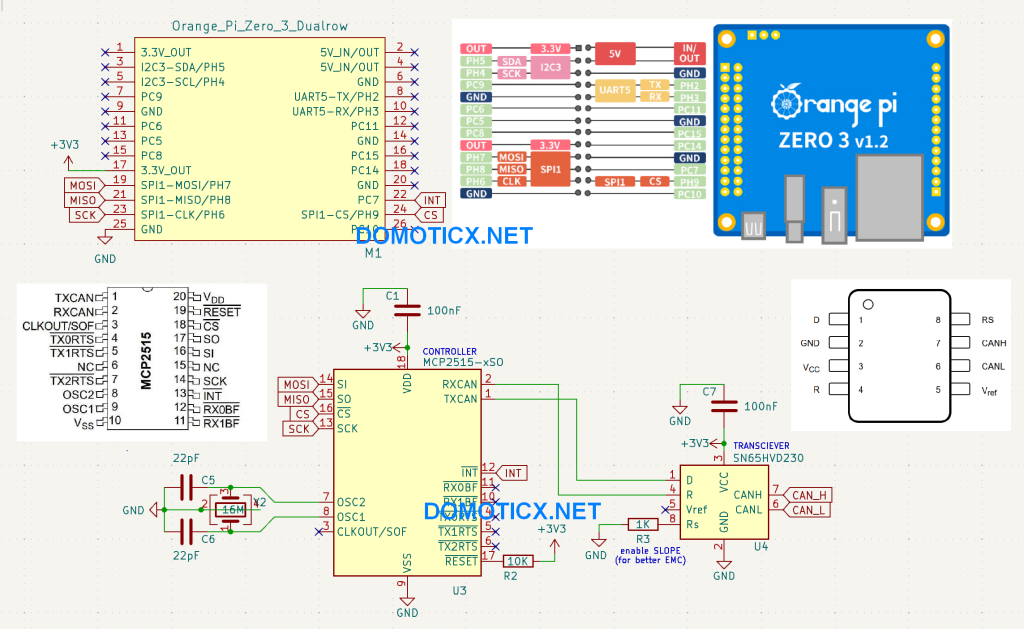
sudo apt install -y can-utilsIn this example we are using a MCP2515 SPI CAN controller and a SN65HVD230 CAN transciever for CAN 2.0B Classic communication on a Orange Pi Zero
Connection schematic:
MCP2515 Overlay #
To use the MCP2515 we first need to create an overlay for the IO pins:
sudo nano /boot/dtb/spi-mcp251x.dtsContents:
/*
 * Device tree overlay for mcp2515 @ can0 on SPI1.1 (Orange Pi Zero 3)
 */

 /dts-v1/;
 /plugin/;

 / {
     compatible = "allwinner,sun50i-h616";

     fragment@0 {
         target-path = "/";
         __overlay__ {
             can0_osc_fixed: can0_osc_fixed {
                 compatible = "fixed-clock";
                 #clock-cells = <0>;
                 clock-frequency = <16000000>;
             };
         };
     };

     fragment@1 {
         target = <&pio>;
         __overlay__ {
             can0_pin_irq: can0_pin_irq {
                 pins = "PC7";
                 function = "irq";
                 bias-pull-up;
             };
         };
     };

     fragment@2 {
         target = <&spi1>; /* Use SPI1 */
         __overlay__ {
             #address-cells = <1>;
             #size-cells = <0>;
             mcp2515@1 {
                 compatible = "microchip,mcp2515";
                 reg = <1>; /* Use SPIx.1 */
                 pinctrl-names = "default";
                 pinctrl-0 = <&can0_pin_irq>;
                 spi-max-frequency = <10000000>;
                 interrupt-parent = <&pio>;
                 interrupts = <2 7 0x08>; /* PC7 IRQ_TYPE_LEVEL_LOW */
                 clocks = <&can0_osc_fixed>;
                 status = "okay";
             };
         };
     };
 };
Please note:
- SPI 1.1 is used
- Interrupt (INT) is PC7
- Clock is 16Mhz
If you have used another crystal/resonator (e.g. 4 MHz), please adjust the value above to ‘clock-frequency = <4000000>;‘
If you have used another crystal/resonator (e.g. 8 MHz), please adjust the value above to ‘clock-frequency = <8000000>;‘
Add the overlay to the system:
sudo dtc -I dts -O dtb -o /boot/dtb/allwinner/overlay/sun50i-h616-spi-mcp251x.dtbo /boot/dtb/spi-mcp251x.dtsThe overlay should compile and added withouth any errors
Set hardware interfaces #
To enable the overrlay and set the SPI hardware settings:
sudo nano /boot/orangepiEnv.txtadd after overlay_prefix:
overlays=ph-i2c3 ph-uart5 spi0-spidev spi1-cs1-spidev spi-mcp251x
param_spidev_spi_bus=0
dtparam=spi=on
Enable in network interface #
To enable CAN in the network interface edit the network interfaces file:
sudo nano /etc/network/interfacesadd at the end:
auto can0
iface can0 inet manual
    pre-up /sbin/ip link set can0 type can bitrate 250000 triple-sampling on restart-ms 100
    up /sbin/ifconfig can0 up
    down /sbin/ifconfig can0 down
Now reboot:
sudo rebootCheck hardware #
After reboot check the hardware, is the chip succefuilly initialised?
dmesg |grep mcpShould output:
[ 6.200783] mcp251x spi1.1 can0: MCP2515 successfully initialized.If you got this error, then check your wiring!:
[    5.874150] mcp251x spi1.1: MCP251x didn't enter in conf mode after reset
[    5.874247] mcp251x spi1.1: Probe failed, err=110
[    5.874259] mcp251x: probe of spi1.1 failed with error -110
Check if CAN adapter is in the network tree:
sudo ifconfig can0Output:
can0: flags=193<UP,RUNNING,NOARP>  mtu 72
        unspec 00-00-00-00-00-00-00-00-00-00-00-00-00-00-00-00  txqueuelen 10  (UNSPEC)
        RX packets 591393  bytes 35896384 (34.2 MiB)
        RX errors 0  dropped 0  overruns 0  frame 0
        TX packets 2347  bytes 18692 (18.2 KiB)
        TX errors 0  dropped 47 overruns 0  carrier 47  collisions 0
        device interrupt 68
CAN change baudrate #
You can change baudrate this way, first turn off the can0 interface:
sudo ip link set can0 downThen enable the can0 interface again with the desired baudrate example 500kbit:
sudo ip link set can0 up type can bitrate 500000Recieve CAN data #
To check recieved dat you can use candump:
sudo candump can0Example output:
  can0  013   [7]  DD A5 04 00 FF FC 77
  can0  014   [7]  DD A5 04 00 FF FC 77
  can0  011   [8]  DD A5 03 00 FF FD 77 00
  can0  012   [8]  DD A5 03 00 FF FD 77 00
  can0  013   [8]  DD A5 03 00 FF FD 77 00
  can0  014   [8]  DD A5 03 00 FF FD 77 00
  can0  011   [7]  DD A5 04 00 FF FC 77
  can0  012   [7]  DD A5 04 00 FF FC 77
  can0  013   [7]  DD A5 04 00 FF FC 77
  can0  014   [7]  DD A5 04 00 FF FC 77
  can0  011   [8]  DD A5 03 00 FF FD 77 00
  can0  012   [8]  DD A5 03 00 FF FD 77 00
  can0  013   [8]  DD A5 03 00 FF FD 77 00
  can0  014   [8]  DD A5 03 00 FF FD 77 00
  can0  011   [7]  DD A5 04 00 FF FC 77
To see RX/TX you can use:
candump -x can0 can0 RX - - 014 [8] DD A5 03 00 FF FD 77 00
can0 RX - - 011 [7] DD A5 04 00 FF FC 77
can0 RX - - 012 [7] DD A5 04 00 FF FC 77
can0 RX - - 013 [7] DD A5 04 00 FF FC 77
can0 TX - E 720 [8] 00 00 00 00 00 00 00 00
can0 RX - - 014 [7] DD A5 04 00 FF FC 77
can0 RX - - 011 [8] DD A5 03 00 FF FD 77 00
can0 RX - - 012 [8] DD A5 03 00 FF FD 77 00
can0 RX - - 013 [8] DD A5 03 00 FF FD 77 00if you have 2 canbus interfaces you may want to add color:
candump -x -c can0Filter data
To filter data e.g. a specific ID, you can use for example ID 11:
candump -x can0,011:7FFSend CAN data #
You can send CAN data by using cansend [ID]#[MESSAGE], example
sudo cansend 003#010203FDFF